


TEPS TriPrism Portrait and Event workflow software is designed for professional photographers seeking digital technology solutions to expedite the process of delivering their products and services to their customers.
The TEPS Print Center is designed for DNP printers using TEPS TriPrism, TEPS Sales Station, or Bamboo.
The general prefs set the overall settings for TEPS that help set the desired use and sets preferences for the overall use of TEPS.
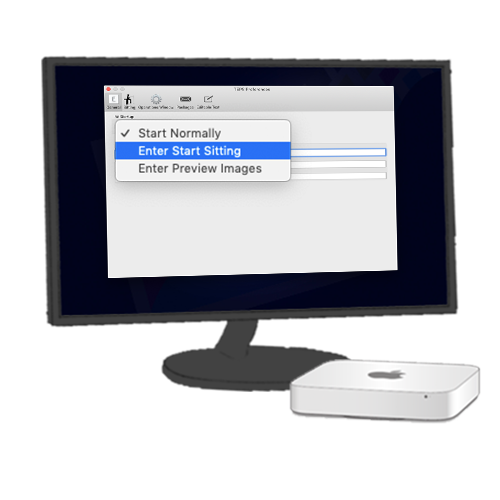
TEPS TRIPRISM offers the option on how you would like TEPS to start up.
Start Normally presents the user with the opening screen asking what they would like to do.
Enter Start Sitting automatically enters the sitting mode waiting for your photo entry method and ready to take photos.
Enter Preview Images automatically enters the preview mode where your photographer can select images to preview and print from file.
TEPS TRIPRISM offers the ability to closely integrate with Bamboo Registration. Using the TEPS Browser option allows your customers to register on a tablet device, then your photographer can pull the ID from TEPs Browser.
Start Sitting This URL is where TEPS pulls the registration ID from a URL. Often times, the URL will follow a similar pattern:
http://localhost:9090/registrationorders/photostationlist
Preview Images Once the photo has been captured, the next computer will preview the images. This can be accomplished by setting the browser URL. Often times, the URL will follow a similar pattern:
http://localhost:9090/registrationorders/poslist
Enter when printing package If your location does not participate in pre-registerring using TEPS, but you still Text or email, then there is a strong likelihood you use the following URL:
http://localhost:9090/tepsregistration
! CAUTION
This feature requires the use of Bamboo. Learn more about Bamboo HERE.
If your location uses Bamboo on a separate server computer, you will replace 'localhost' with the host computers IP address OR sharing name.
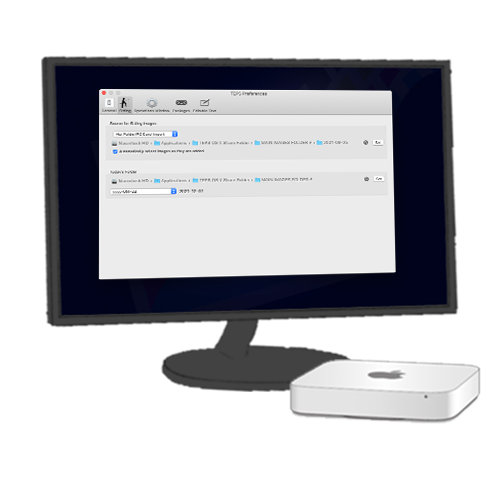
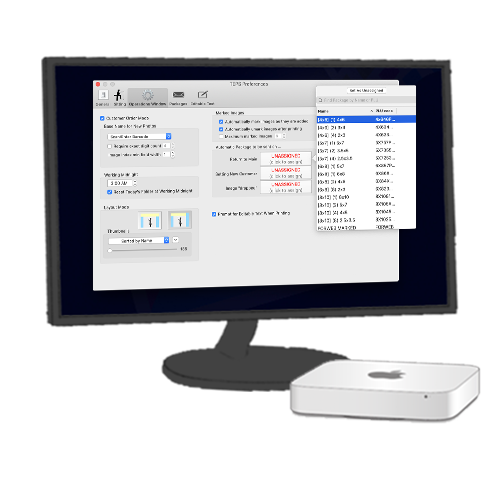
The sitting prefs set the sitting folders for the hot folder and for the main images folder for TEPS TRIPRISM. The daily sitting folder can be modified to fit various sitting name needs.
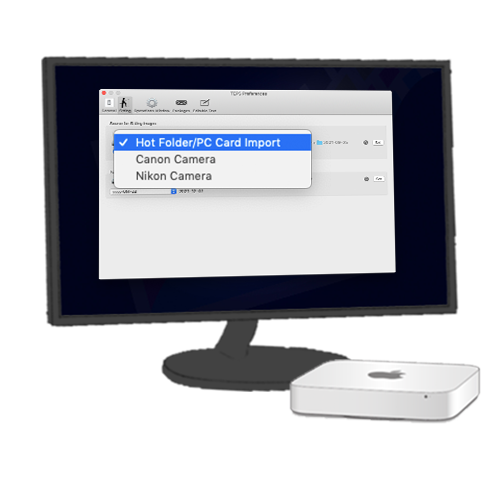
This preference sets the preference for how images are acquired. TEPS TRIPRISM supports PC Card Import, Camera Hot Folder, using TEPS CanonCapture, or using TEPS Nikon Capture.
We recommend always setting the the Hot Folder Path (if not otherwise used) to the following path:
/Users/Shared/TEPS HotFolder
If you are using third party hot folder software; you can set the hot folder to match your third party software's source image folder so the images load into TEPS.
Automatically select images as they are added If this option is selected, then each image will drop into the main preview window as it is loaded into TEPS. This is recommended to be turned OFF when loading froma camera / pc card volume.
If using "Canon Camera" or "Nikon Camera" the Automatically run camera control app preference shows. This preference will automatically open the TEPS CanonCapture / TEPS NikonCapture software when TEPS enters Start Sitting.
If using "Canon Camera" or "Nikon Camera" the Automatically RE-launch on crash/quit preference shows. This preference will automatically re-open the TEPS CanonCapture / TEPS NikonCapture software should it quit for any reason.
The Main Images folder needs to be set. This is the folder that will contain all the original images that are imported into TEPS TRIPRISM.
We recommend always setting the the Main Imgaes folder to an easily accessible path such as:
/Applications/TEPS OS X Share Folder/Main Images
If your computer is networked (where one or more computers access the main images folder simultaneously); We recommend creating a shared folder (under the shared user account) and always setting the the Main Imgaes folder to a folder designed to be shared such as the following:
/Users/Shared/Server Shared Folder/Main Images
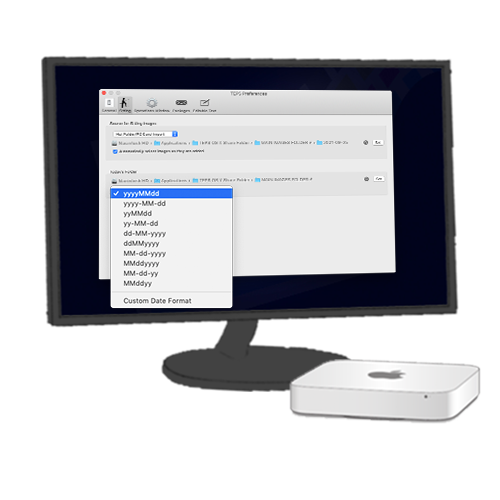
In some instances, you may wish to make the images go into a custom sitting folder names for easy organization.
The sitting folder name can be customized using multiple options. To adjust how the sitting folder names the folder that contains the images; click "Edit..." Then drag your tokens to the dark grey to adjust how sitting folder is created.
If no option is set, the images will be saved to the Main Image folder with no enclosing folder.
We recommend using a daily folder format so that images are arranged in a dated folder for event photography such as the following
"Year"-"Month"-"Day"
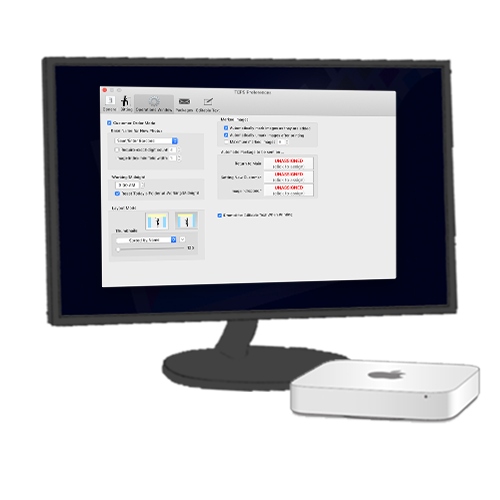
The operation window controls how images are named, how they are displayed, and other operating tasks such as automatic printing.
TEPS can be used either in Customer Order Mode or without customer order mode. The difference is whether each "Sitting" is unique to the customer or non-unique.
For instance, if a portrait photographer has many unique "groups" or "sittings" and it would be beneficial for a portrait photographer to go back and identify their "Sitting." In this instance, the photographer could opt to have "Customer Order Mode" turned on. This enables the use of BarCode / QR Code / RFID / manual entry of a customers code.
There may be other instances where photos may be captured, but naming the photos is not as important. This may be for like trade shows / open floor events where images land, but keeping track of particular clients is not important. In this instance, a photographer may opt to turn off "Customer Order Mode" and allow the images to be named a unique file format. There's also an option to regenerate the base file name for each customer so that each photo has a unique file name.
★ DID YOU KNOW?
Using TEPS Triprism, combined with PT CheckOut / PT Microsite you can create qr codes that embed urls? Use the following format when generating your QR codes for a truly unique experience!
FOR PT CHECKOUT USE:
http://ptiphotos.com/shop/ACCOUNTNAME/CODEHERE
FOR DIGITAL DOWNLOAD IMAGES USE:
http://ptiphotos.com/ACCOUNTNAME/CODEHERE
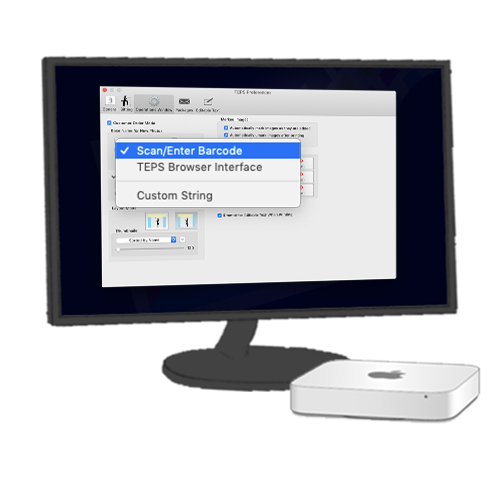
There are three unique base name options that can be used when generating new images.
Scan/Enter Barcode is primarily used when "Customer Order Mode" is enabled. With this option selected, every "sitting" has a prompt to scan or type in a barcode / qr code.
TEPS Browser Interface is used in conjunction with Bamboo registration. When customers register using Bamboo, TEPS can acces the registration information to take the photo and then can be used to recall the photo to preview and print it in a sales capacitiy.
For instance, there may be a registration station, where customers enter their name, email address, and phone number; then a photographer station where a customer has their photo captured; and then there may be preview / print stations after where a customer can have their images printed on site. In this scenario, customers register, then at the Photographer station, the photographer simply selects the customer from a list of registered individuals; and then once done, the the preview station can pull the images after they were captured - all by selecting a name on the screen, instead of using bar code / qr code.
Custom String You can use "Custom String" option to generate random code assignments for each group. Using this method, you can assign various options using drag and drop tokens like random number, year, month, day, second, milisecond, original file name, and more. These tokens can be used in combination with namually entered text or other options to generate unique file names for each image.
In addition to naming the image you can also set other variables to make sure your image naming criteria are matched.
"Require exact digit count" is an option that allows your file names to match an exact number of digits. This is beneficial in instances where you may require a set number of characters for a file name. When entering a new file name, the software will validate agains this requirement to make sure that the new photo code has this number of digits.
"Image Index min field width" is the minimum number of characters left when naming an image. Example: IMAGE_001 would have a image index min field width of "3" (note the two zeros in front of the 1. IMAGE_01 would have an image index field of "2" - essentially, it's the number of digits to count for image file name.
With Customer Order Mode turned OFF there is an option to "Regenerate basename for each image." With this option turned on; every time a new image is loaded into TEPS, the base file name is recreated. For Instance, if assign the base name to be Year + Month + Day + Minute + Second + Milisecond (YYYYMMDDMINSSmmmm) then, if you take a photo, the first YYYYMMDDMIN will match, but the SSmmmm will be different. This assures that each image has a unique file name. With the option turned off, all images would otherwise have the same file name YYYYMMDDMINSSmmmm; but they would index after _001, _002 etc.
Many events operate on a rotating / daily basis and it's adventageous that every day the sitting folder move from one operating day into the next operating day. Some examples include Santa, Easter Bunny, Haunted Houses / Events.
In some cases, these events may remain open past midnight and it may be adventageous to set the working midnight to later in the day. This means that as images are captured, they remain in the current day's "sitting" folder util the working midnight time is met.
You can turn this option on or off and set the desired 'working midnight' time from here.
We have two layout modes. The difference is whether the thumbail window runs along the entire top (the option on the left); or if it ends where the print window / tool bar starts on the right hand side (option on the right).
There is also a slider to adjust the thumbnail size. Closer to the left, smaller thumbnail image size, then closer to the right; the larger the thumbnail image size. Most operations opt to size the thumbnail around size 200.
There is also a slider to adjust the thumbnail size. Closer to the left, smaller thumbnail image size, then closer to the right; the larger the thumbnail image size. Most operations opt to size the thumbnail around size 200.
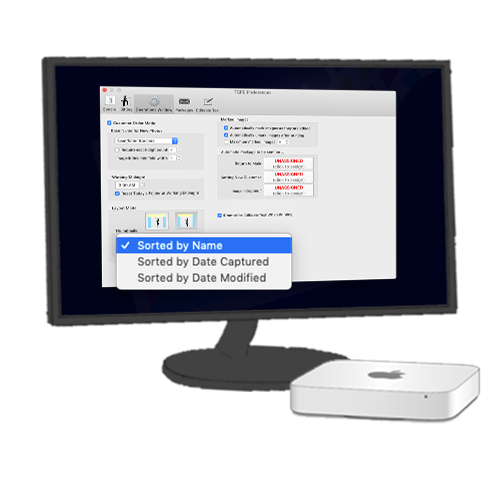
There may be a variety of reasons why you want images to sort differently when entering the thumbail window in TEPS. Currently, there are three supported modes:
Sorted by Name images are sorted alphabethically by name.
Sorted by Date Captured images are sorted chronologically based on the date/time the image was captured / imported into TEPS. (We recommend most operations use this method).
Sorted by Date Modified images are sorted chronologically based on the last date/time the images were modified (not recommended for most operations).
To the right of that drop down window you will see an up arrow / down arrow. The up arrow will set the sort order to ascending, where the down arrow sets the sort orderd to descending. One way searches in a forward pattern, and flipping the the arrow switches the defualt search order.
"Show Navigation Buttons" was a feature introduced in version 1.3.7 that allows you to have a jump to beginning, end, page right, or page left. Also included is a "jump to" section, and an add images from folder option.
Introduced in version 1.3.7 there is an option to restrict the type of images you see in the Thumbnail window.
"All Image Types" will show all images regardless of if they can be printed or not.
"All Image Types Except RAW" will show all images types unless they are RAW images.
"Only JPEG" Images will only display JPEG images that can be printed by TEPS.
This section describes actions as far as how images should be checked (marked) as they enter the TEPS application
"Automatically mark images as they are added" places a check mark next to images as they are added to the thumbnail window.
"Automatically unmark images after printing" removes the check mark next to images after they are printed with either a canvas or package print.
"Maximum marked images" Allows you to place a limit on the maximum number of images that can be selected at any given time. This option can be used to restrict / control the maximum number of images that can be selected for digital download packages, print packages, or other packages where you may want to limit the total quantity being sent at any given time.
TEPS TRIPRISM can be configured to print specific packages during certain prompts or triggers.
Return To Main This trigger would occur any time the red "X" is pressed in the upper, left-hand corner of TEPS.
Setting New Customer occurs when "Comand + 1" is pressed, or a new barcode / qr code is scanned and a new 'setting' has started.
Image Dropped happens when an image is dropped from the thumbnail window into the preview/operation window.
Packages are selected by clicking on the button, then double clicking on your desired pre-built package. See "Packages" section for information on creating packages.
TEPS TRIPRISM can detect when a second monitor is plugged in and display images only on the external monitor.
External display receives live updates When enabled, what ever you have in your preview / operation window is reflected outward to the customer window.
External display hides when inactive Removes the preview when not actively previewing outward to customers.
ℹ INFO
Using two monitors allows your operator to look at one screen and your customer to view a different screen. One of the positives is that the customer only sees what you want them to see, not all your tools.
When printing a preview template that contains editable text; you will be prompted to enter the editable text in the package window (Useful for things like Christmas Cards).

The Packages window is used to set up printing options with TEPS. The main use is to create output canvases are used to create packages that can later be used to set your package buttons.
An output canvas is a template that has been assigned properties to be used when being use to save to file or print to a printer. Output canvases can be used to create packages. There are two main types of Output Canvases:
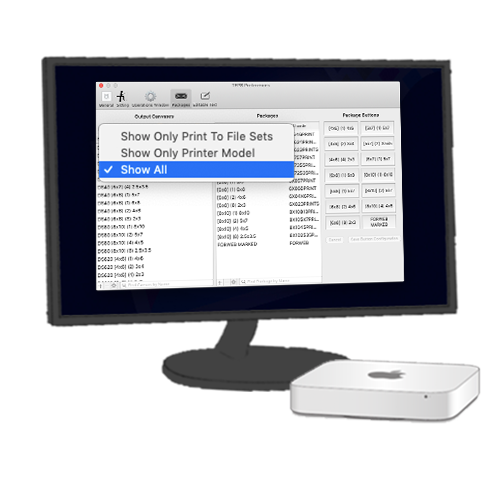
"Print To File Sets" are canvases that save the image to file or a path (like digital download images). If you select "Show Only Print To File Sets" you can see a new drop down menu that allows you to filter which path the images are saving to so you can only see those specific canvases.
"Printer Model" are canvases that are designed to print a printer. If you select "Show Only Printer Model" you can see a new drop down menu that allows you to filter which printer the canvases are linked to so you can only see those specific canvases.
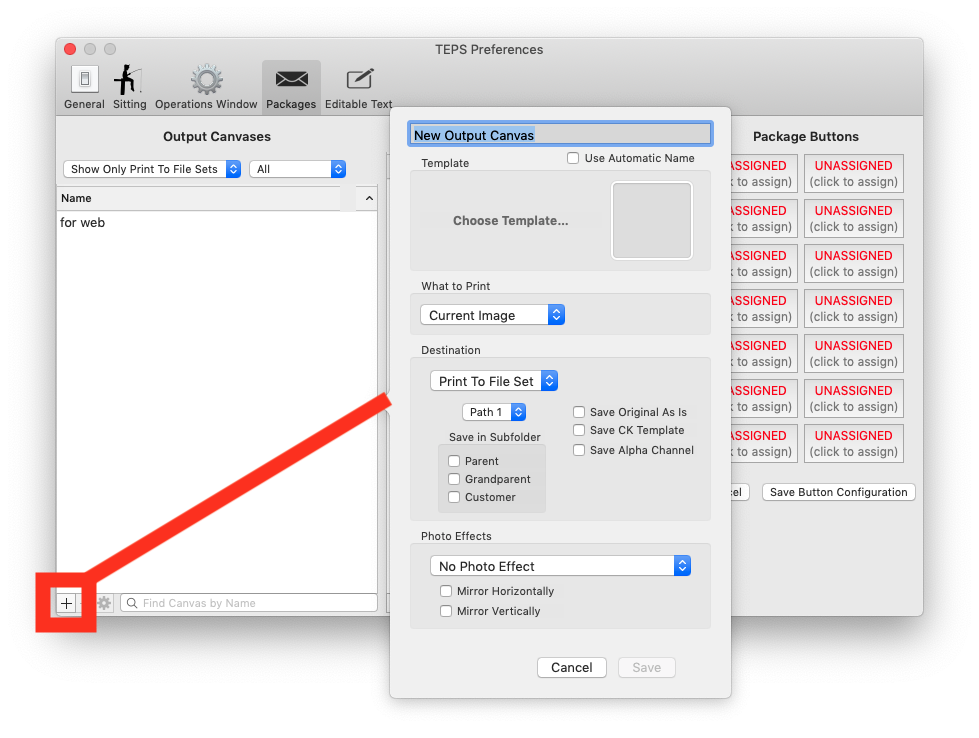
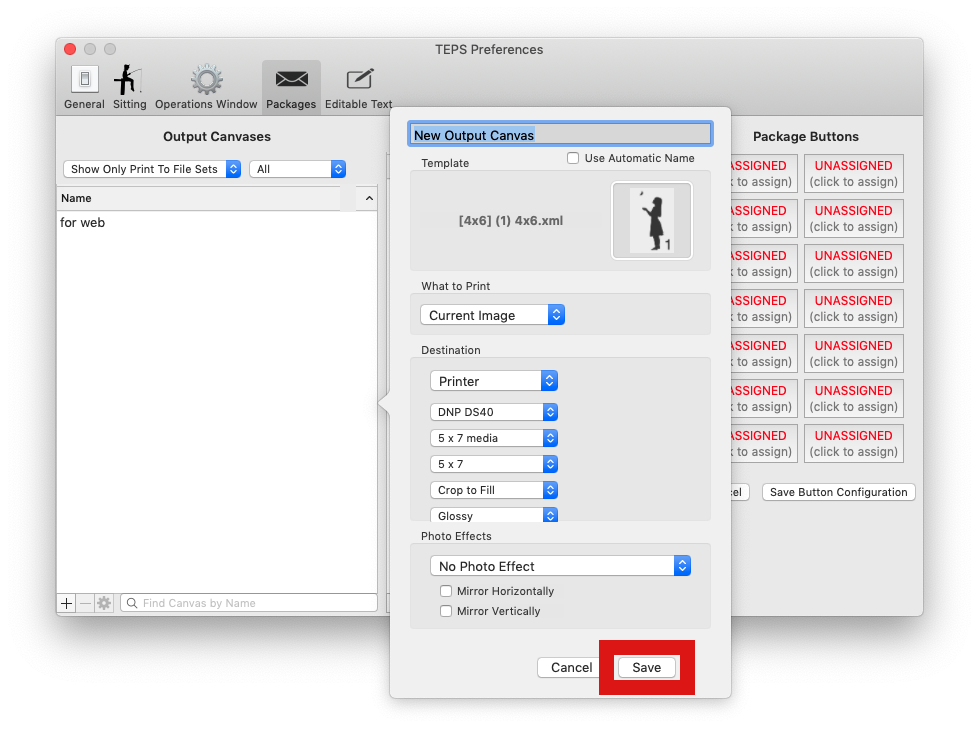
To create a new output canvas, select the "+" symbol in the lower left-hand corner. A new dialogue window will open with canvas setup options.
• CREATING NEW PRINT TO FILE
• CREATING NEW PRINT (DNP)
• CREATING NEW PRINT (OTHER PRINTERS)
Assign the new canvas a unique name or check the box for "Use Automatic Name." Using an automatic name is a system generated name designed to help symbolize possible options of your canvas.
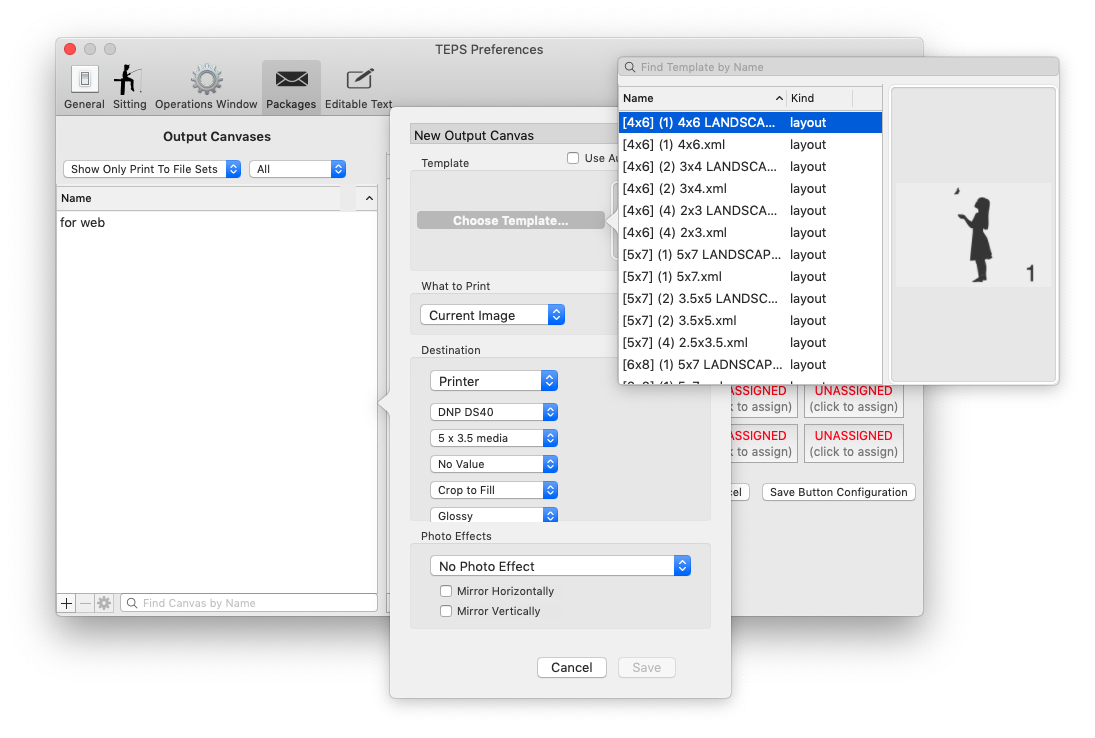
Press the dark grey words "Choose Template..." You will see a new window pop up with a list of your available "Print Templates" (See Templates for more information). Double click on your desired print template to select it.
There are three options you can choose from:
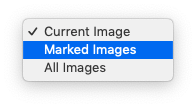
"Current Image" whatever is in the preview / operation window will be printered
"Marked Images" all images marked with a check box will be printed
"All Images" all images will print
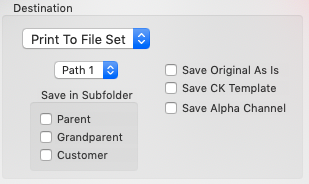
The destination for "Print To File Set" is "Print To File Set"
You can set up to eight different file Paths each path can be set separately in the TEPs Processor (see TEPS Processor for more information). Important note, is that your Path here needs to match your desired processor path.
⚠ IMPORTANT
You will need to set your path destination in the TEPS Processor. You can assign up to 8 paths, but each path will need to be set in the TEPS Processor.
Sometimes when saving images, you may need to save images in subfolders. "Parent" is the enclosing folder of your image. "Customer" is the client name. "Grandparent" is the enclosing folder 2 above where your image is located.
CUSTOMER FOLDER: /ABCD1234/ABCD1234_001.jpg
PARENT FOLDER: /PARENT/ABCD1234/ABCD1234_001.jpg
GRANDPARENT FOLDER: /GRANDPARENT/PARENT/ABCD1234/ABCD1234_001.jpg
Save Original As Is When this option is applied the original, unedited image is the image that is used to print to file
Save CK Template saves the selected image with any color adustments and how the image is composed in in the Preview Template window
Save Alpha Channel is used when working with Green Screen images. With Save Alpha Channel turned on, the image is saved as a transparent .png
ℹ INFO
If saving with "Alpha Channel" is enabled, your corresponding "Path" in the TEPS Processor should save the image as a .PNG file.
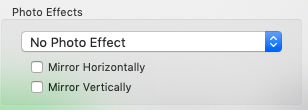
You can select desired photo effects such as the finish color. "Mirror Horizontally" flips the photo on the horizontal (X) axis. "Mirror Veritcally" flips the photo top dows (Y) axis.
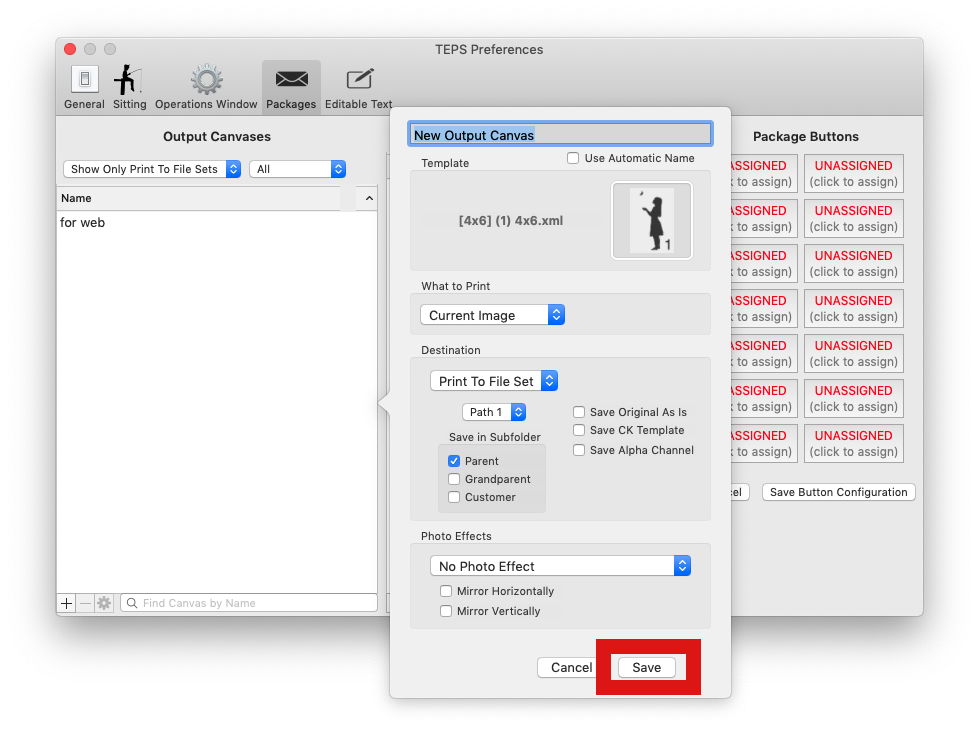
You can now click "Save" to save this canvas.
Assign the new canvas a unique name or check the box for "Use Automatic Name." Using an automatic name is a system generated name designed to help symbolize possible options of your canvas.
Press the dark grey words "Choose Template..." You will see a new window pop up with a list of your available "Print Templates" (See Templates for more information). Double click on your desired print template to select it.
There are three options you can choose from:
"Current Image" whatever is in the preview / operation window will be printered
"Marked Images" all images marked with a check box will be printed
"All Images" all images will print
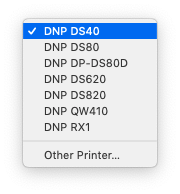
Select your DNP Printer from the dropdown list
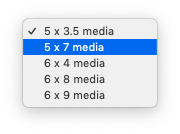
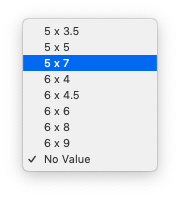
Select your media size from the drop down list
Select the size the printer should cut your media. (NOT YET IMPLEMENTED v1.3.7)
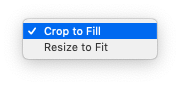
You can choose between "Crop To Fill" where the image will cut out extra or "Resize to Fit" may result in white space
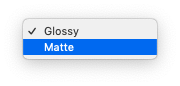
You can choose supported media finishes for your printer.
You can select desired photo effects such as the finish color. "Mirror Horizontally" flips the photo on the horizontal (X) axis. "Mirror Veritcally" flips the photo top dows (Y) axis.
You can now click "Save" to save this canvas.
Install your third party print drint driver and install your printer.
Then, assign the new canvas a unique name or check the box for "Use Automatic Name." Using an automatic name is a system generated name designed to help symbolize possible options of your canvas.
Press the dark grey words "Choose Template..." You will see a new window pop up with a list of your available "Print Templates" (See Templates for more information). Double click on your desired print template to select it.
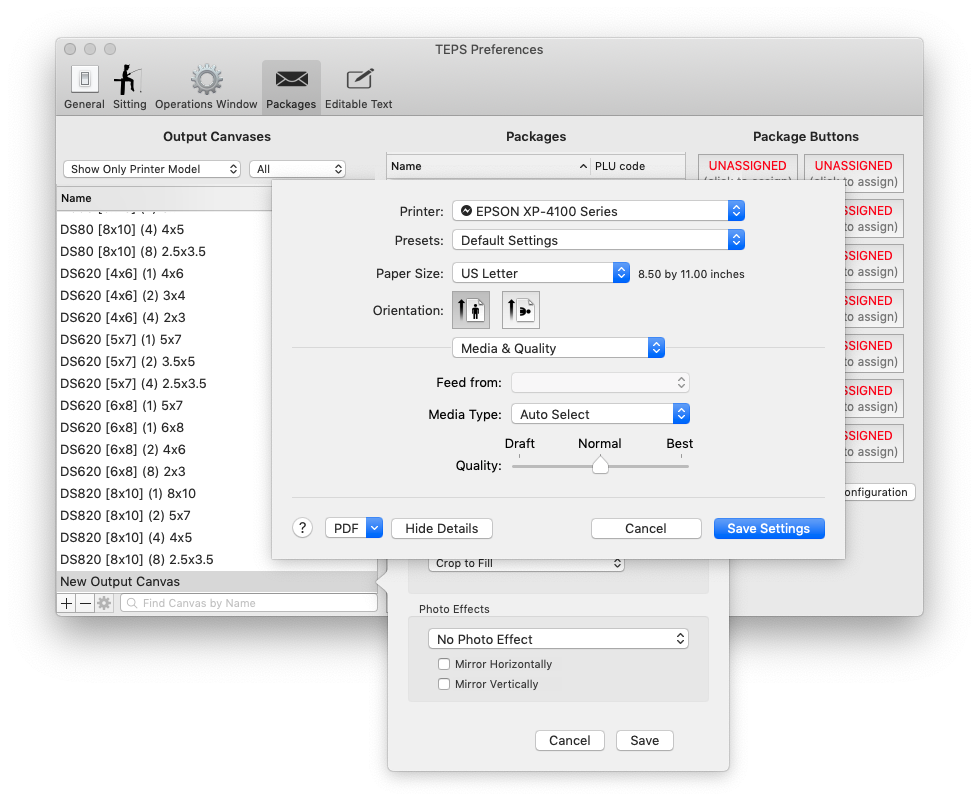
Under Printer, then select "Other Printer.
The built-in Apple CUPS dialogue window. Select all your necessary options and settings for your printer.
You'll need to repeat this for each size and template going to the printer.
You can select desired photo effects such as the finish color. "Mirror Horizontally" flips the photo on the horizontal (X) axis. "Mirror Veritcally" flips the photo top dows (Y) axis.
You can now click "Save" to save this canvas.
Once you have created your desired output canvases, it's now time to use those canvases to create 'packages.' A package consists of one or more output canvas. Packages are used for automatic printing, or to be used when pringing with TEPS. To get started press the "+" symbol on the package side.
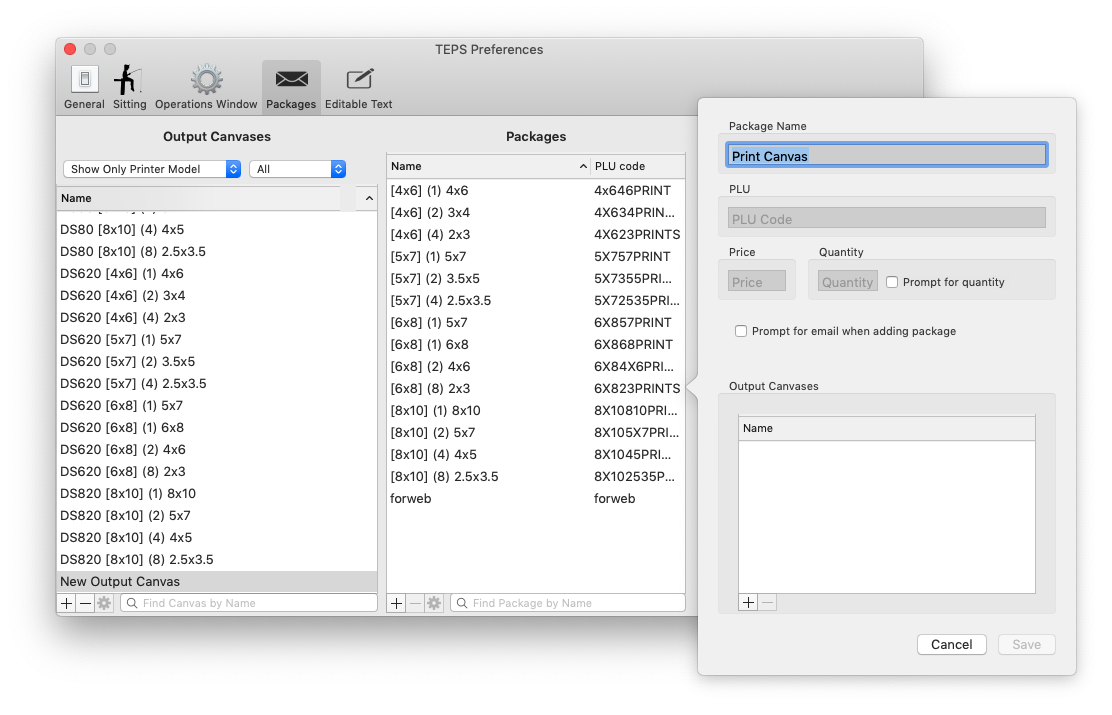
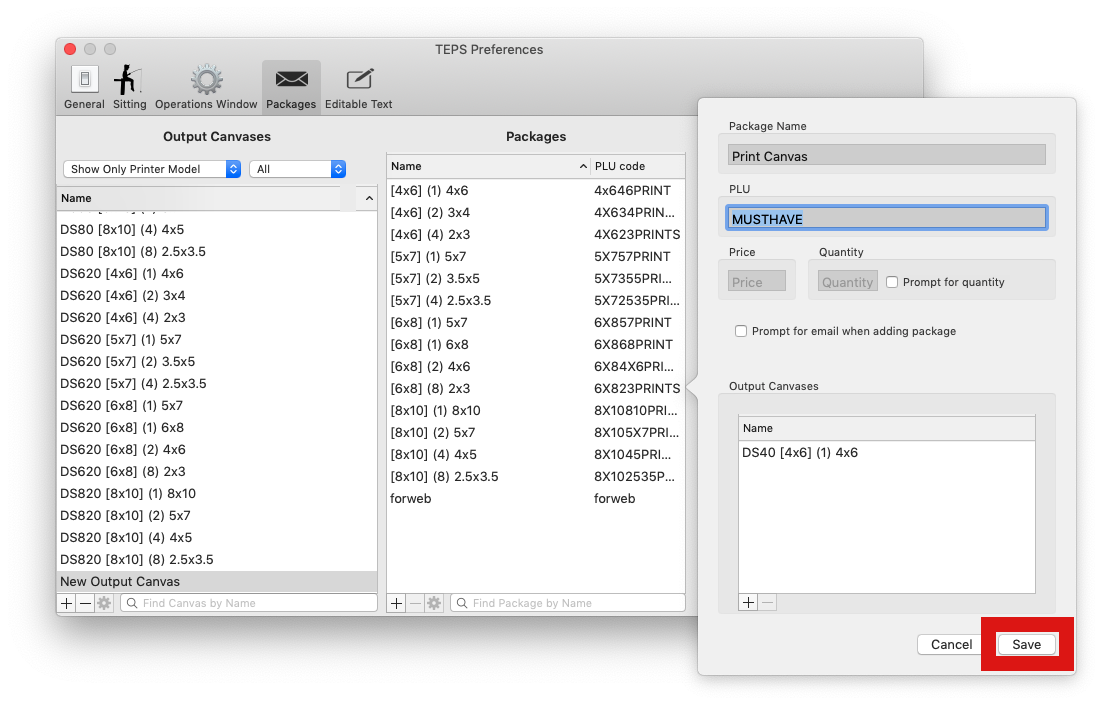
Package Name Begin by assigning your package a unique name that you (or your operators) will use when printing.
PLU All packages must be assigned a PLU code. The PLU Code should contain only letters and numbers, no spaces, or special characters
Price You can assign an optional price field.
Quantity The default quantity when left empty is 1
Prompt for Quantity When checked, once the button is pressed when operating TEPS, the operator will receive a prompt for print quantity of that item.
Prompt for Email When checked, you will receive a TEPS Browser notification to enter a customer email.
! CAUTION
The Prompt of Email feature requires Bamboo and TEPS Browser to be installed on your computer. Want to learn more about Bamboo? LEARN MORE
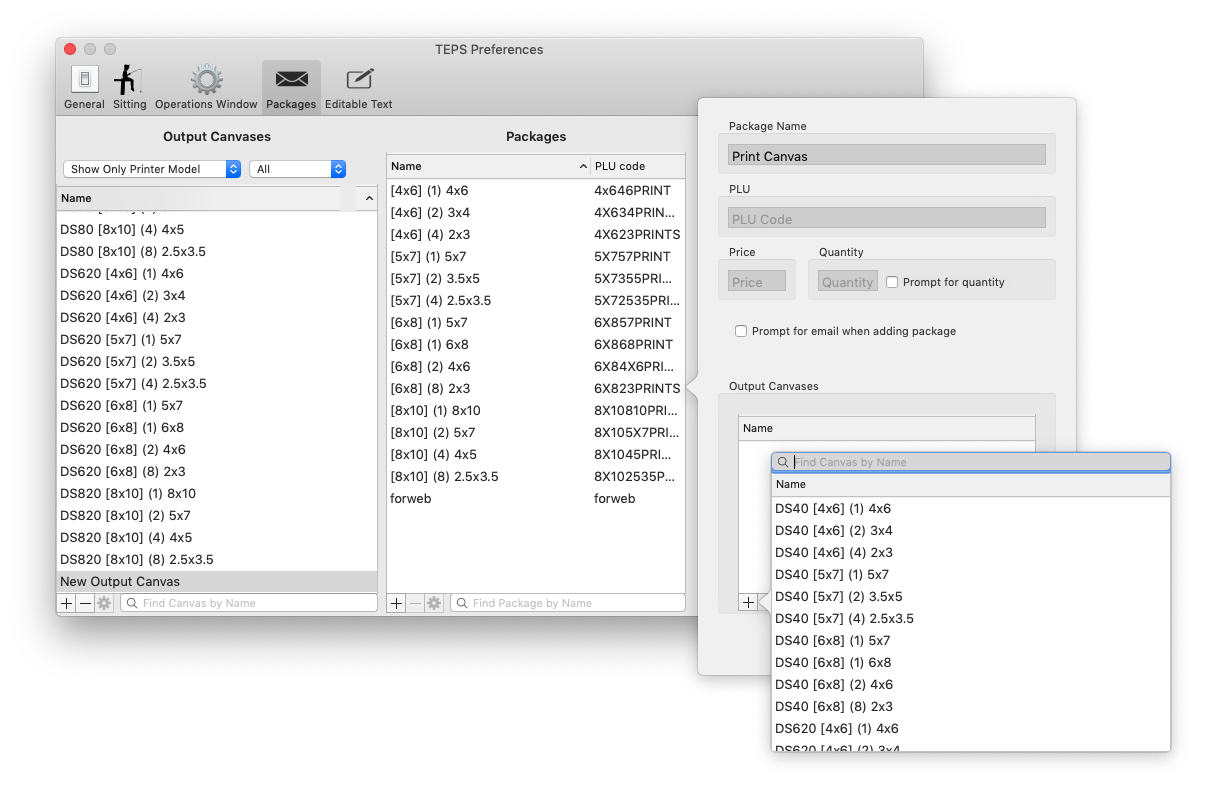
To add a canvas press the "+" and then once you locate your print canvas double click on the canvas. If you want to add additional canvases, continue to press the "+" and select your print template for each item.
Should you make a mistake or wish to remove a canvas, highlight the canvas and then press the "-" symbol.
Once you are satisfied that the package contains everything you wish to print, press the "Save" button.
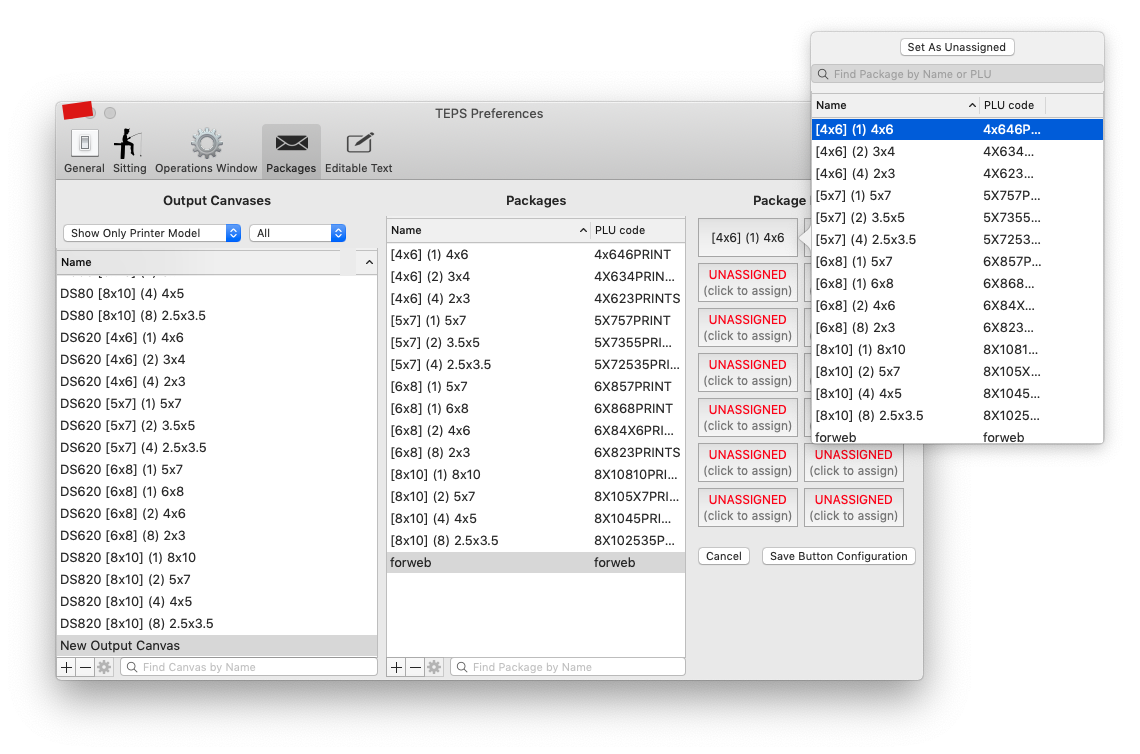
Now that the packages have been created, you can assign them to package buttons for ease of use. Simply click on an "Unassigned" button, then double click on your package to assign it.
Once you have assigned all your desired package buttons click "Save Button Configuration"

Editable text fields are fields that are designed to be easily editable and can be changed either in settings, or on prompt when printing the package.
To set an editable text field, double click the field and type in your desired text.
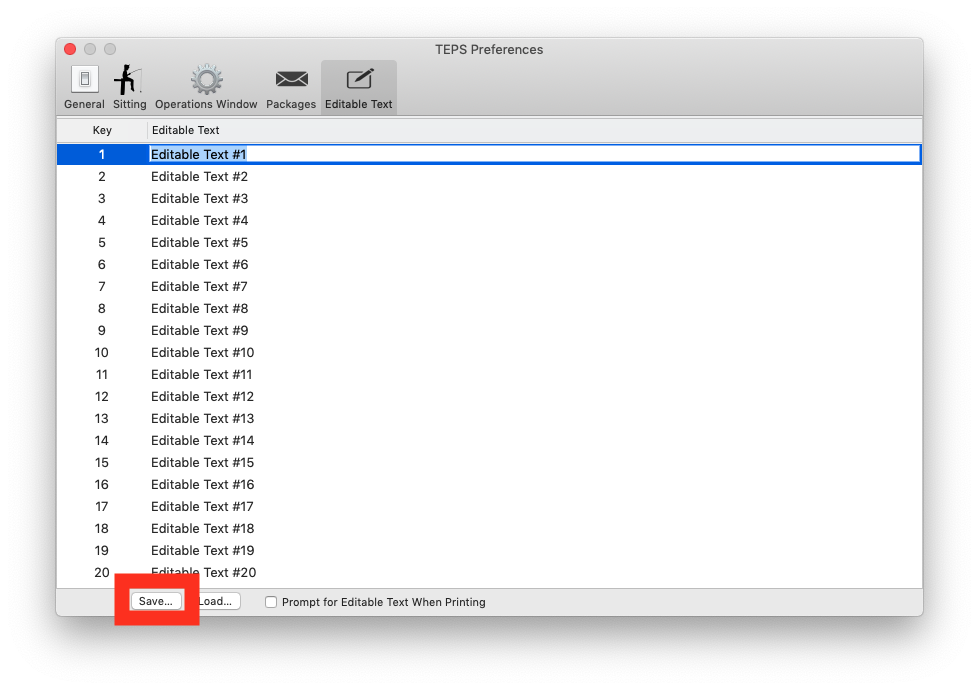
Once you have completed your editable text, press "Save"
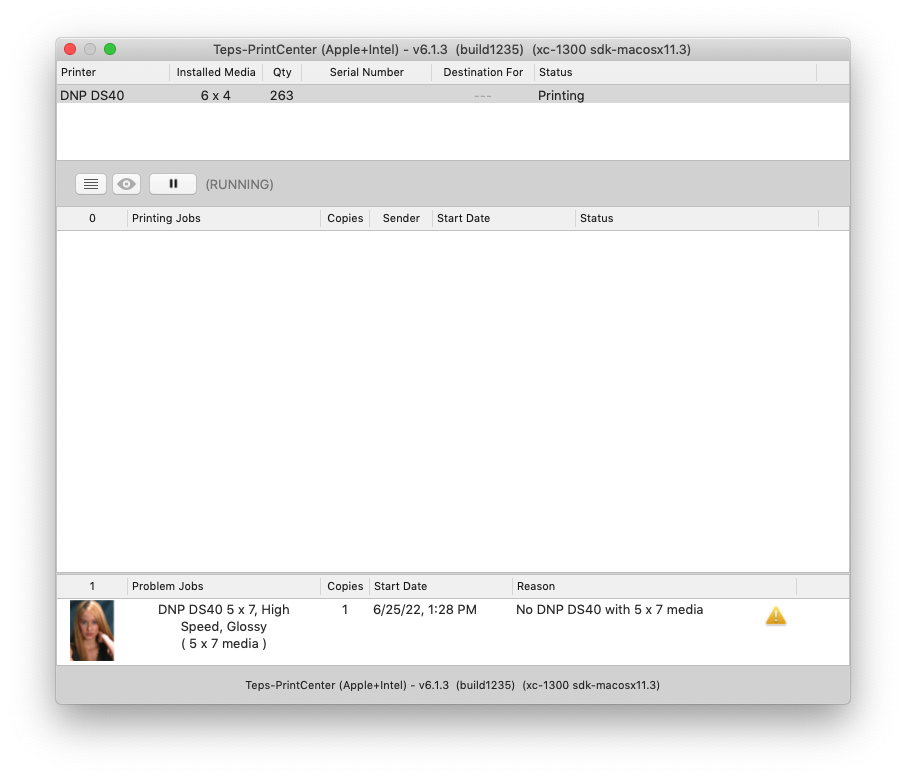
The TEPS Print Center is responsible for sending images to the appropriate printer with the correct media size. The TEPS Print Center is used for DNP printers and has the print driver built directly into the program.
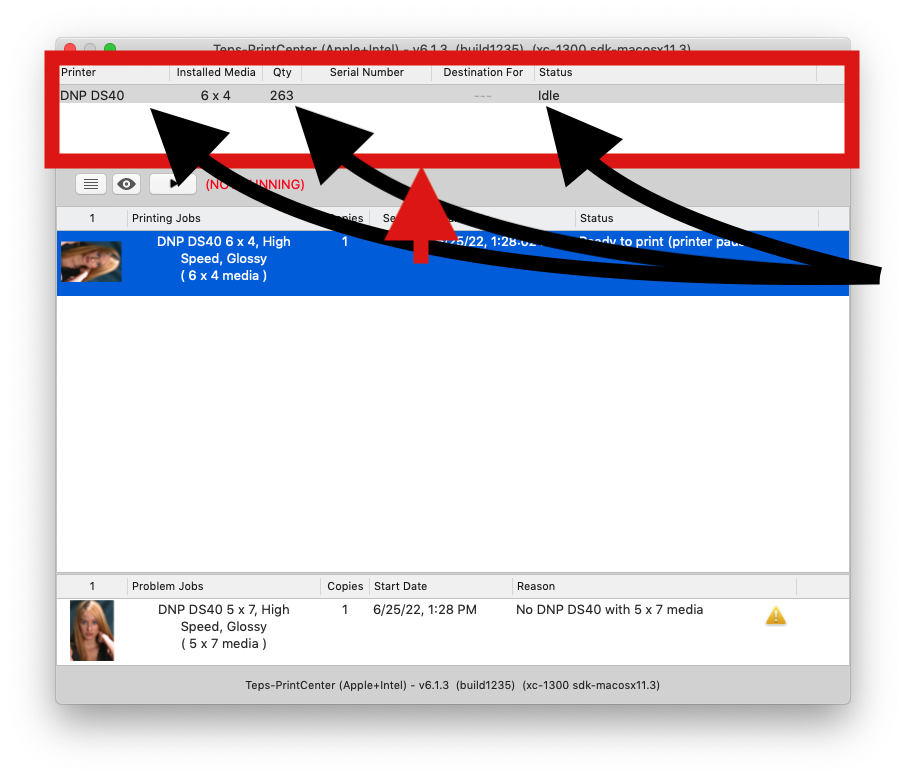
The top section of the print center lists all of your detected printers and details about each printer.
Printer shows you the printer name and type
Installed Media displays the sized of the media installed in the printer
Qty displays the remaining number of prints left on the roll.
⚠ IMPORTANT
DNP Printers require that you replace both the paper and the ribbon at the same time. Please make sure you are replacing both simultaneously according to manufacturer specs.
Serial Number displays the remaining number of prints left on the roll.
Destination For displays what serial number the printer has been set for (unless you have set this information, this field will be blank)
Status displays the current status of the printer and will display any errors / messages such as "Ribbon End" "Cutter Error" or "Printing"
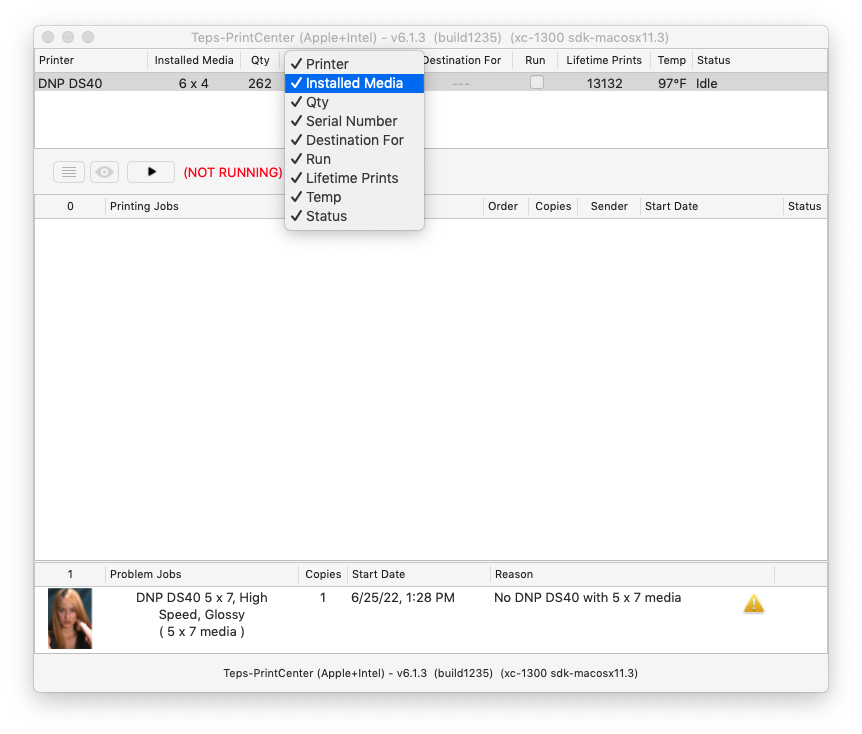
If you right click / secondary click on the printer list menu bar, you can see additional menu options that can be enabled.
Run is a non-selectable checkbox that shows if the printer is accepting new prints or not. (Checkbox Checked = accepting jobs // Checkbox unchecked = paused).
Lifetime Prints shows the total lifetime prints on the printers print-head.
Temp displays the current temperature of the printers Print Head.
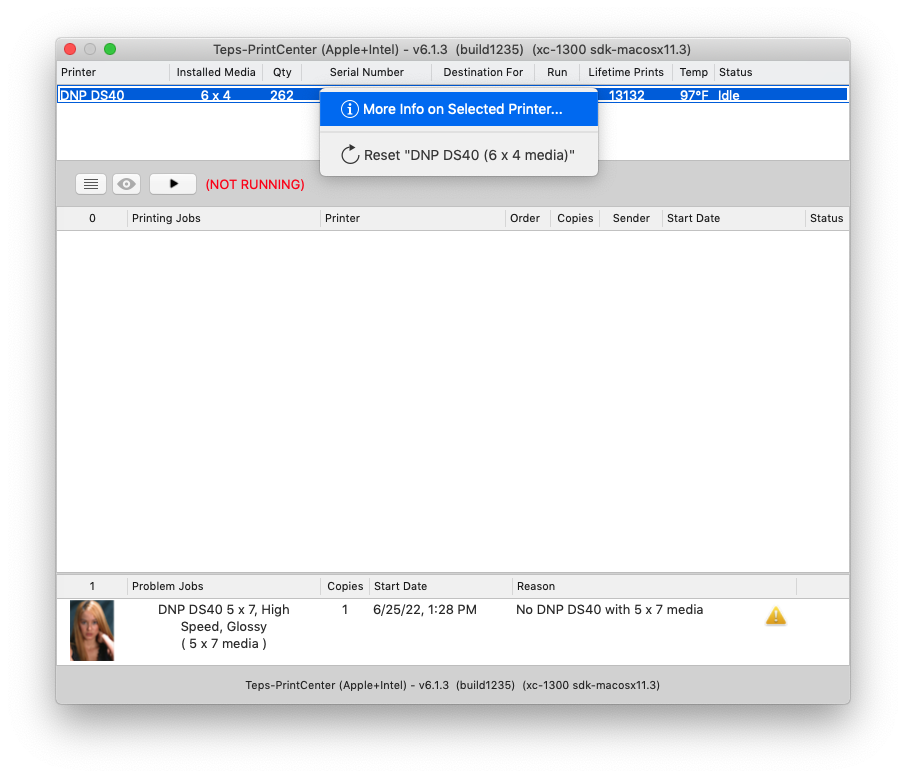
If you right click / secondary click on an individual printer you are presented with options speciifc to the printer.
More Info on Selected Printer.. displays additional detialed information about the specific highlighted printer and provides additional options for the printer.
Reset "PRINTER INFO" resets the USB of the selected printer.
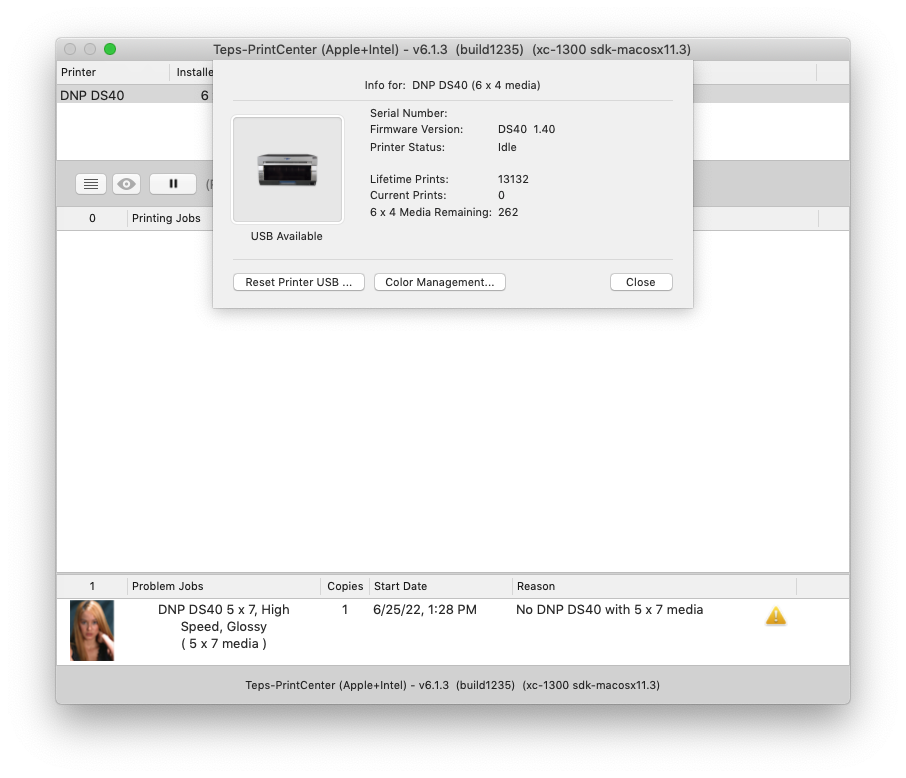
This menu displays useful information about your printer including Serial Number, Firmware Version, and current printer status. Also, you can see your Lifetime print counts, Current Prints, and remaining media.
Reset Printer USB should the printer be locked up, or not responding; you may need to reset the printer USB. This can be accomplished through the "Reset Printer USB..." button
Color Management currently only uses DNP's built in ICC profiles designed specifically for DNP printers.
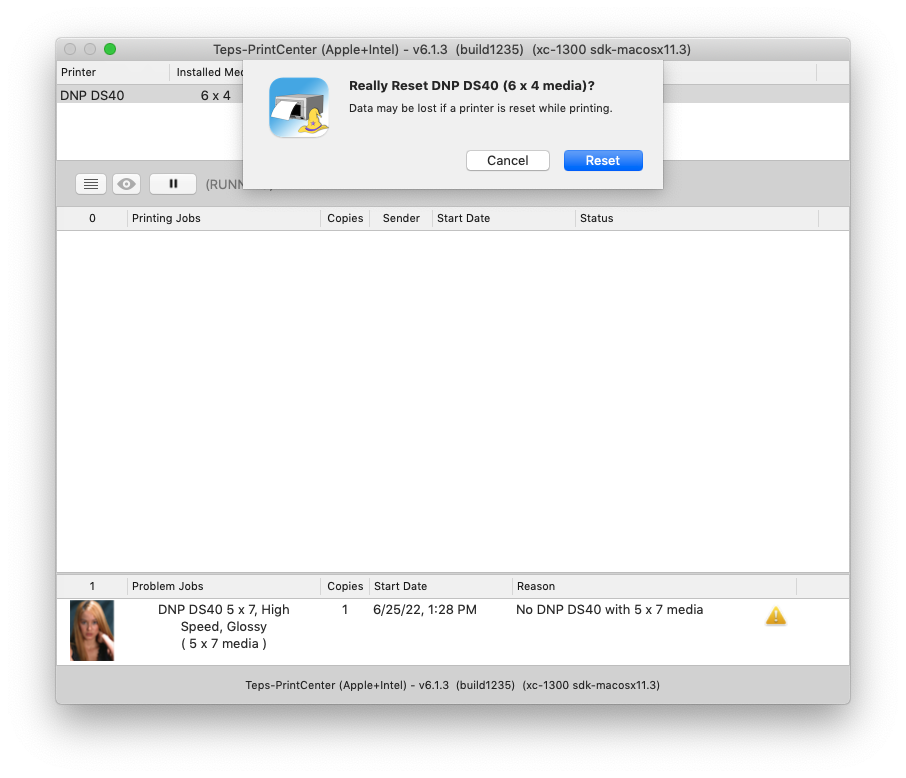
If you opt to try and reset the printer USB as a troubleshooting step; you will be presented with this dialogue window indicating that any print jobs will be lost. Once you continue, the printer will temporarily disappear from the print center before reappearing.
ℹ INFO
This may be beneficial when troubleshooting something like a locked up USB hub or something along those lines. However, this step should not need to be performed on a regular basis.
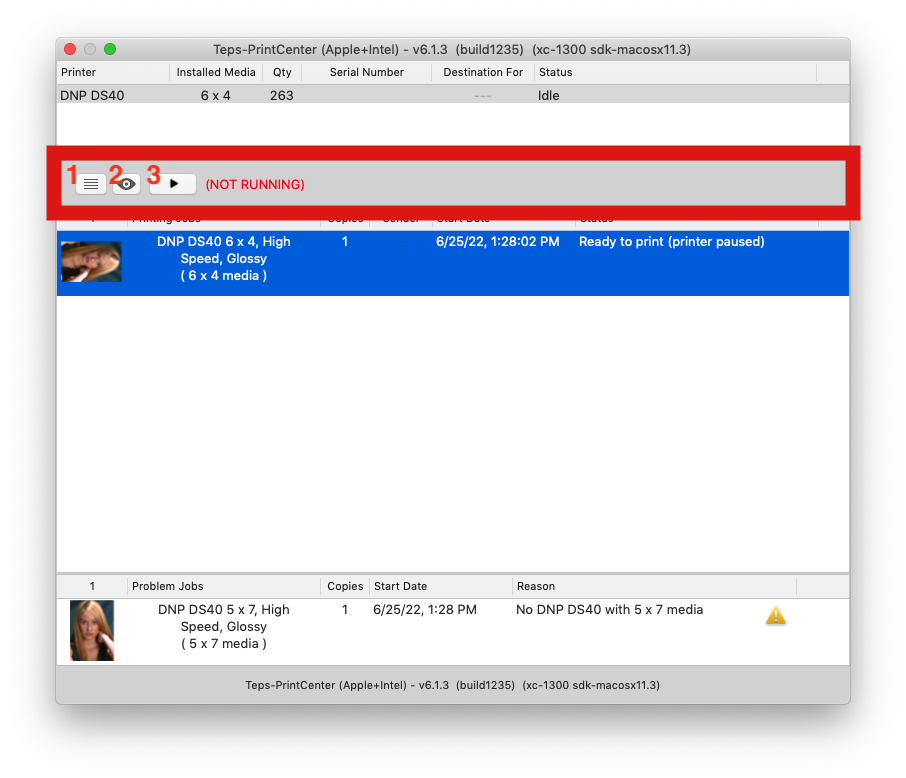
The grey bar immediately below the printer list contains three options for you. From left to right: Preferences, Preview, Play / Pause
PREFERNECES the menu button is three straight lines vertically aligned. When pressed, it will bring up the PREFERNECES menu.
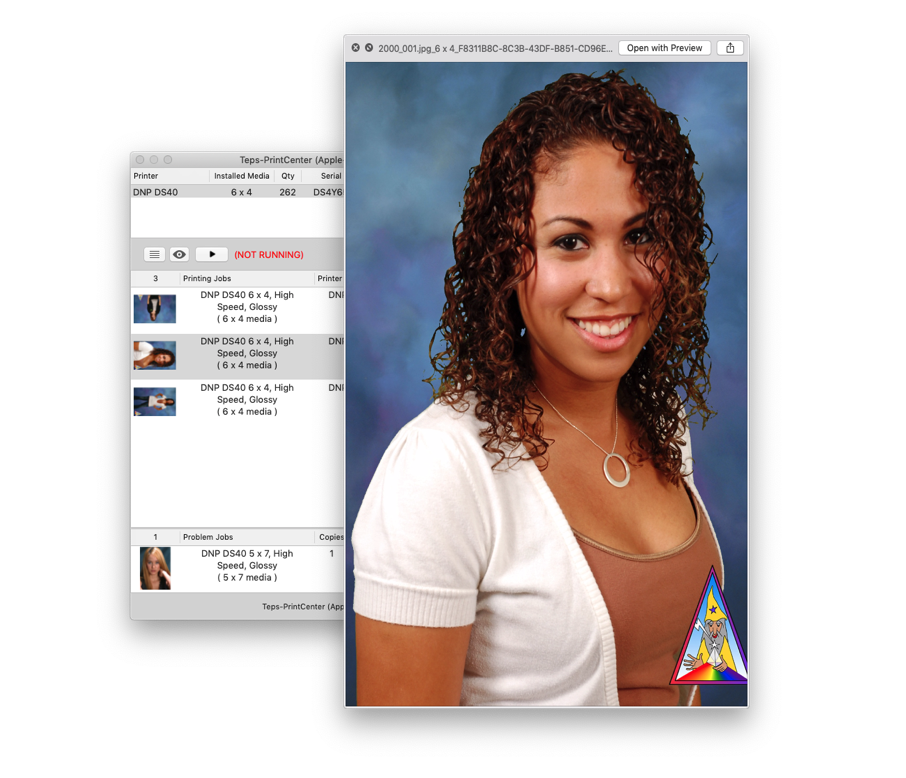
PREVIEW option allows you to quickly see a full screen render of either an active job or a problem job image. The button is greyed out (non-selectable) unless you first click on a photo that is being sent to the printer. Once you click on a photo, the photo will become highlighted and the preview button becomes active.
PLAY / PAUSE This button allows you to pause all print jobs going to the printer. During normal operations, the button will look like a pause button and to the right, you will see text that says (RUNNING). When the print center is paused, you will see a "Play" icon and there will be text in red that says (NOT RUNNING)
ℹ INFO
Sometimes when you're troubleshooting layout related questions, it's best a best practice to pause the prints. Once you pause the prints, you can send the test prints to your print center to quickly preview what they'll look like before printer. Don't forget to delete your test prints and resume your printer before proceeding to production!
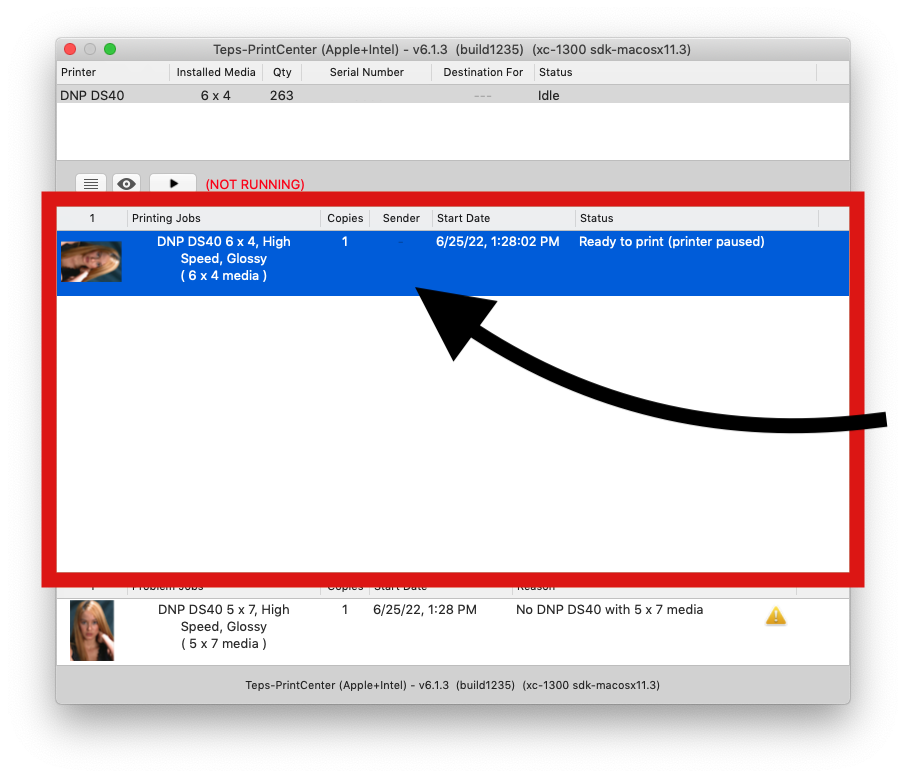
Print jobs that have been queued up and are waiting for a printer to become available are listed immediately below the action menu. All these jobs have been found to match a printer and are available to be printed.
By default there are selection print detail menus that give you necessary information to print.
Thumbail the thumbnail is a visual representation of what will print.
Printing Jobs provides detailed information about te print including printer type, media size, finish, and media type.
Quantity displays the number / quantity of that print job to be printed
Sender displays the serial number of the device that sent the print job (when enabled)
Start Date displays the date and time the print job was sent
Status displays the current status of the print job.
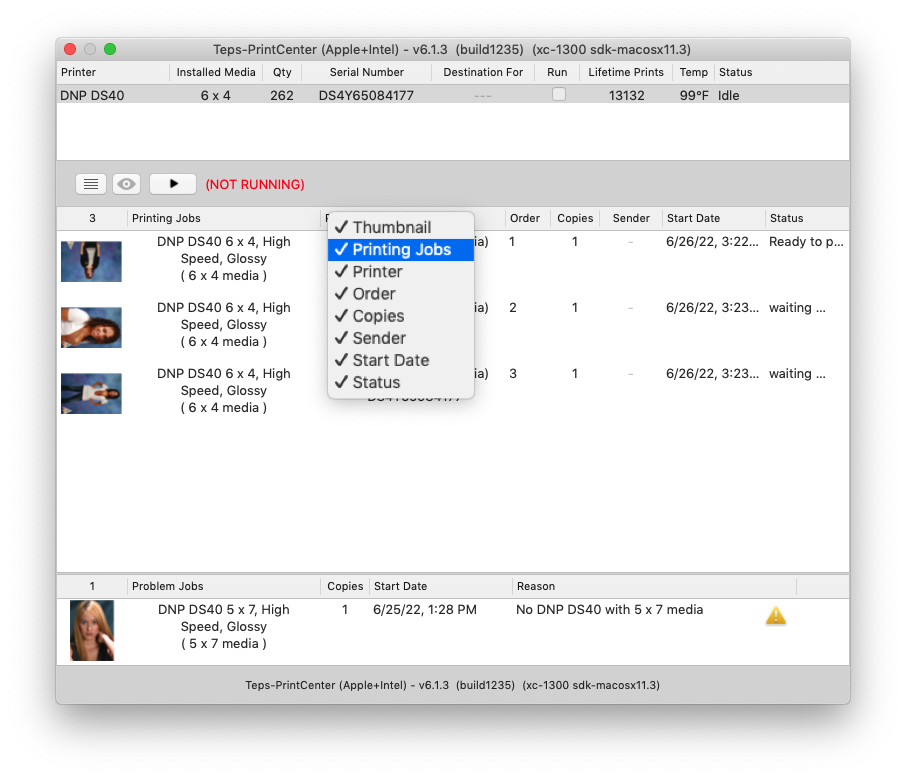
You can add or modify the selected print jobs by right clicking on the menu bar and selecing additional options.
Printer displays the destination printer information including the serial number of printer to be printed to.
Order displays the order in which the images will be printed.
You can preview a job waiting to be printing by selecting / highlighting it and then pressing the "Preview" icon on the action bar above. Alternativetly, you can select / highlight the print job and then press your spacebar on your keyboard.
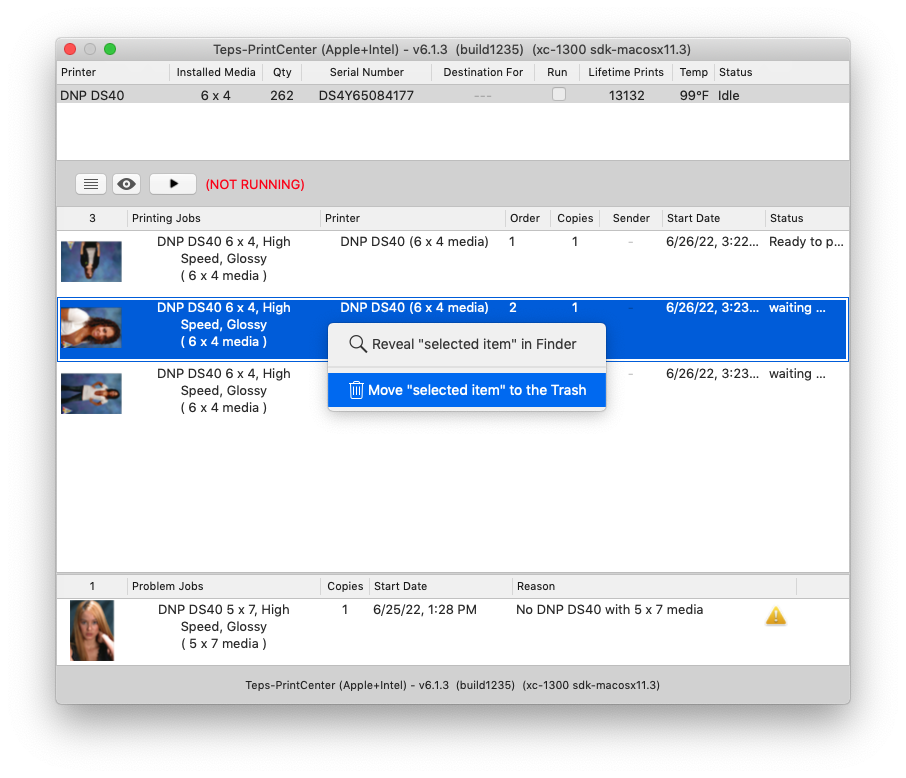
To delete a print (or multiple prints), select / highlight the desired jobs, then right (secondary) click on the highlighted job and press "Move "selected item" to the trash"
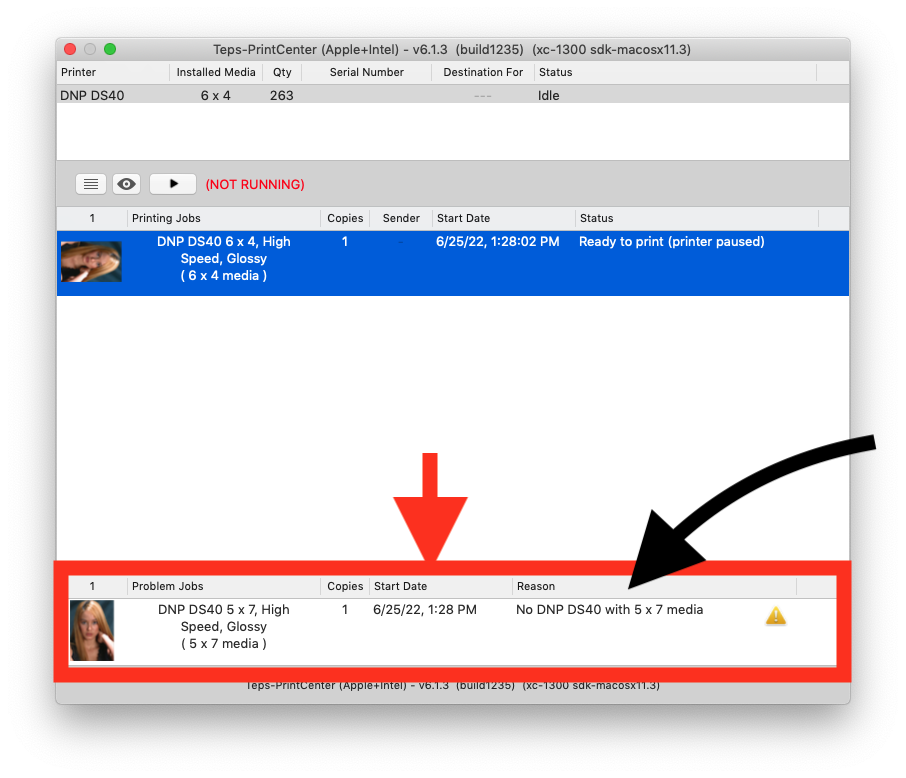
The very bottom section shows up when the Print Center has indicated there are jobs that have problems associated witih them. The problem may be something such as media mismatch (Example: a photo was sent to a printer with 5x7 media; however, no printer with 5x7 media is turned on or installed). The reason for the issue is shown in the "Reason" field
Thumbail the thumbnail is a visual representation of what will print.
Problem Jobs provides detailed information about te print including printer type, media size, finish, and media type.
Copies displays the number / quantity of that print job to be printed
Start Date displays the date and time the print job was sent
Reason displays the current status of the print job and why this is a problem job.
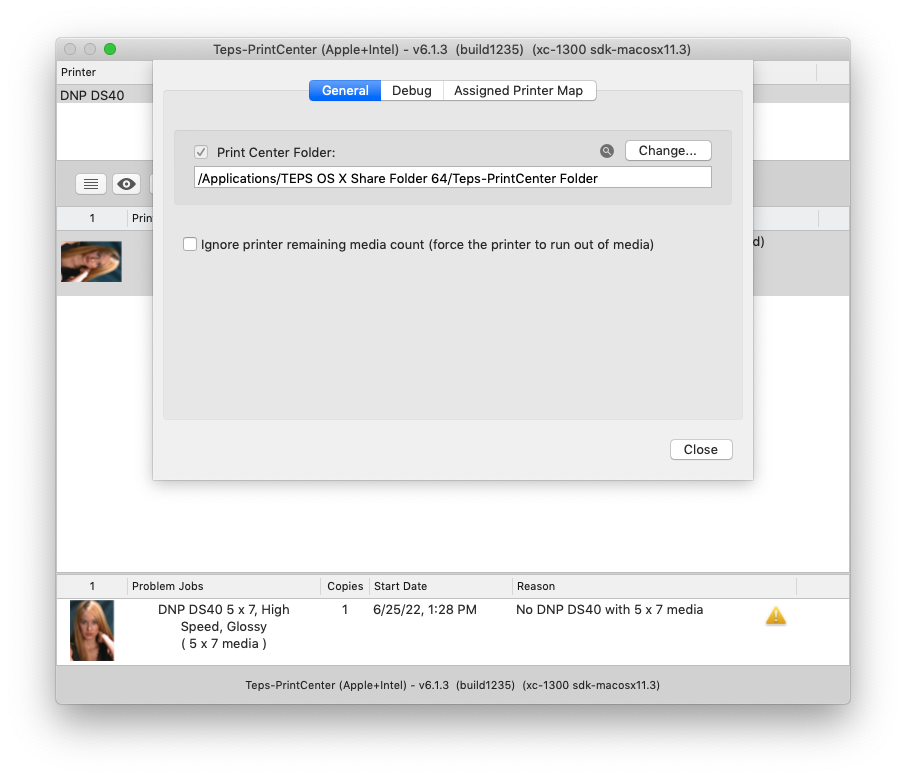
The TEPS Print Center has limited preferences in the prefernece menu. The Preferences menu can be accessedd by pressing the three lines on the action menu or by pressing "command" + "," ( ⌘ , )
The first panel "General" allows you to set the TEPS PrintCenter folder and determine the behavior of the printer should the printer run out of media.
Print Center Folder is where the TEPS PrintCenter folder is. This folder should match the location set in the TEPS Processor. For Single Computer operations the folder location is usually located:
/Applications/TEPS OS X SHARE Folder/TEPS PrintCenter/
For setups that have one or more sales stations and share the printers on one computer
/Users/Shared/Server Shared Folder/TEPS PRINT CENTER
Ignore printer remaining media count (force the printer to run out of media) This option forces the printer to run out of media which prompts the "paper" / "ribbon" warning light on the printer. This option will cause the last print to be lost. Otherwise, with this option turned off (default); the TEPS-PrintCenter will come to the front when the printer runs out of media.
⚠ IMPORTANT
The following steps should only be taken under the guidance of technical support. There is very little (if any) benefit to enable these preferences without direction of support.
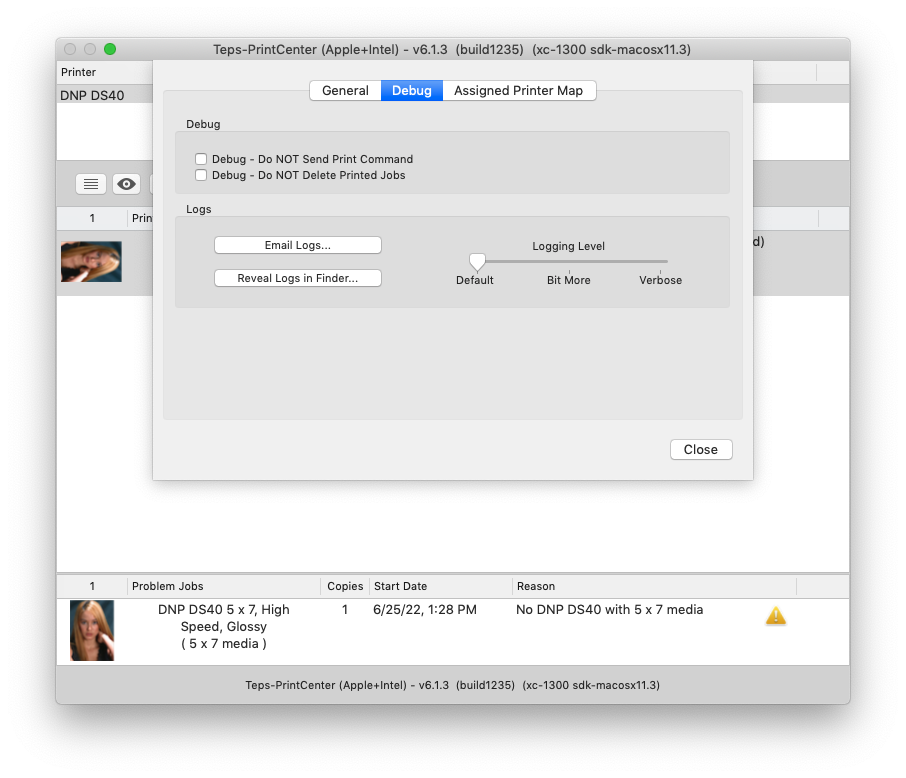
The Debug panel is used for troubleshooting and testing. It may be used by support to identify issues or for log files. This panel should not need to be accessed or used on a regular basis.
Debug - Do NOT Send Print Command this option does not send the print command to the printer. It is used in troubleshooting.
Debug - Do NOT Delete Printed Jobs this option prints the image but does not delete the printed job file. If this option is turned on, the printed images are never deleted (Not recommended for regular use).
⚠ IMPORTANT
The following steps should only be taken under the guidance of technical support. There is very little (if any) benefit to enable these preferences without direction of support.
The Teps-PrintCenter logs files for troubleshooting purposes. These log files are very small and reset/delete on a regular basis. By default, the logging level should be set to Default
Email Logs... In the event you encounter an error, support may request you email us the log files. Pressing this button automatically gathers the log files to be emailed.
Reveal Logs in Finder... this button reveals the folder location on your computer. You can manually navigate to this path at the following url.
~/Library/Logs/Teps/Teos-PrintCenter.log
Logging Level this slider adjusts how much information is logged. The default setting is the lowest, only identifying information necessary for the application to run properly and identify high level issues. Should you encounter issues, support may request you set logging to "Bit more" or "Verbose" level loggin. The middle level logging "Bit more" contains information to pinpoint more complex issues. "Verbose" logging shares everything that is occurring. Keep in mind, the more information that is logged, the larger the files become.
★ Did You Know?
Our support team is here for you when you need them most. Technical support is offered Monday-Friday (9:00AM - 5:00PM Pacific Time) for phone support. You can also contact support any time through email here.

! CAUTION
This feature requires the use of Bamboo. Learn more about Bamboo HERE.
The Assigned printer map is a Bamboo specific feature. It allows you to take different selling devices, (mobile phones, tablets, or computer) and have each of those devices assigned to a specific printer.
Use Destination String From ob (ipaddress from Bamboo Jobs) This check box turns on / off the feature for Bamboo jobs to be assigned a specific printer
In the preview window you can see the default printer along with devices that assigned to that printer.
To add additional printers, or sending devices, enter the IP address on the left, and the printer's destination IP address on the right and then click "Add." Use the remove feature to delete extra (or incorrectly placed) source folders.
© Copyright 2026 by TriPrism, Inc. All Rights Reserved | Version 2.0.0
TriPrism, Inc., 15950 Bernardo Center Drive Suite B, San Diego, CA 92127 | Privacy Statement • Terms of Use